There are many ways to improve website security and this is important to do so that your website can be protected from irresponsible attacks that will harm you. Especially if your website serves as a tool to run business-related clients either eCommerce, online payment for goods and services or other types of online business.
In this article I will try to discuss how to install a free SSL Certificate in WordPress using Let's Encrypt
WORDPRESS SECURITY
WordPress is constantly updated and developed by experienced developers around the world on a regular basis to ensure the platform remains secure and not behind, but even if it's already done by WordPress developers, you as a user also need to work to make sure your site stays safe. All this is done because the internet continues to grow, and the hackers still find new ways to hack the website, especially WordPress is a popular platform and many
 |
The third step is that you should always do regular backups when you want to make changes or will update. Although there is no update made the backup process, you should do on a scheduled basis to avoid problems occur in the future.
The fourth step is that you have to make a change to the default WordPress login URL to a unique URL, this is necessary because the default WordPress URL is already known to all WordPress users and hackers, since this gap is commonly used by hackers to launch brute force actions.
In addition to taking the basic steps listed above, you must enable encrypted communication between your site and your browser. Every time a user accesses your website, servers and browsers exchange the necessary information with each other.
You do not want outsiders to have access to that communication, but it should still be encrypted and used only by web browsers and servers. For that, you should make your site secure by installing an SSL Certificate.
DIFFERENCE BETWEEN HTTP AND HTTPS
HTTP defines rules for data transfer between browser and server. When the security protocol is implemented
Online Banking, E-commerce website, Payment Gateway and many other sites that need to handle sensitive information should use HTTPS for encryption. HTTPS is required to safeguard the interests of customers and businesses. And HTTP on the other hand is used for data transmission between browser and server without encryption.
To get the HTTPS Domain name, you need an SSL certificate from a CA (Certificate Authority). You can use Let's Encrypt to get an SSL certificate and make your website secure for free.
WHAT IS LET'S ENCRYPT?
 |
| Let's encrypt free ssl certificate |
HOW TO INSTALL A FREE SSL LET'S ENCRYPT CERTIFICATE IN WORDPRESS
Let's Encrypt gives you a free SSL certificate and you can use it for WordPress sites. And this is important for you to use while in free, in addition to your website more secure you will get benefits like visitors or your customers will feel more confident about the security of your site and will also have a positive impact on your search engine ranking.
Let's Encrypt is also easy to integrate, especially if you use hosting services like Bluehost, Hostgator, Siteground which let you to create SSL certificates with Let's Encrypt in their
Steps to create a free SSL certificate using Let's Encrypt on hosted hosting Let's Encrypt.
Step 1. Login to your
 |
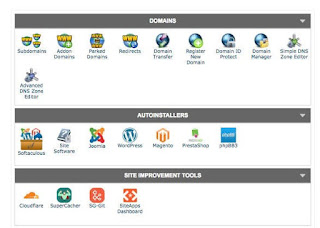
Step 2. Go to the "Security" section and click the "Let's Encrypt" icon.
 |
| Let's Encrypt |
 |
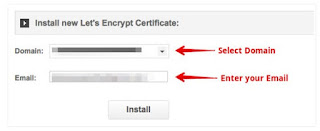
| Select Domain Install SSL Certificate |
Step 4. Click Install or Add Now option.
Step 5. Save the certificate you have created. Because you will need it later.
If your web hosting does not offer a Let's Encrypt option in
WEBSITE CONFIGURATION TO MAKE SSL CERTIFICATE WORKING
Once you create an SSL certificate for your domain, you need to configure your website and load the certificate to work.
Step 1. Open
 |
Step 2. Open File Manager or FTP.
 |
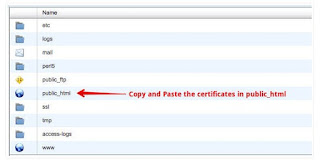
Step 3. Copy and paste the certificate file in the public_html folder on your site.
 |
| Copy Paste Certificates Public_html Install SSL Certificate |
Step 4. Close FTP and return to the
 |
Step 5. Click 'Install and Manage SSL for your site (HTTPS)'.
 |
| Manage SSL Install SSL Certificate |
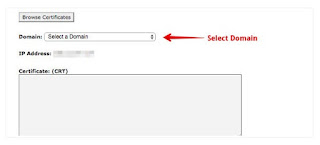
Step 6. Copy the code from
Step 7. And paste the code into each available box.
 |
| Enter Values Install SSL Certificate |
After the above process is complete, please save and your SSL encryption certificate should already be active on your site.
UPDATE URL WORDPRESS TO HTTPS
After securing your website with an SSL certificate, you need to change your URL from the HTTP URL to the HTTPS URL from your WordPress Dashboard. Without changing the URL, the SSL certificate will not work, and your website will not be
Step 1. Login to your WordPress website Dashboard.
Step 2. Point the cursor to 'Settings' and click 'General'.
Step 3. Change your WordPress Address and Site Address from HTTP to HTTPS.
Step 4. Click the 'Save Changes' button.
After completing the steps above, your website has become an HTTPS website with an SSL certificate installed therein.
If you have a new website, then the process is complete, but if you already have a website that has many pages indexed in Google, it will cause some problems. Some pages of your site will be loaded using the HTTP protocol, and others will be loaded with HTTPS. This can be very counterproductive to your search engine rankings. In addition, many backlinks that use HTTP will no longer work.
But you do not have to worry because there are some plugins like 'Really Simple SSL' that you can install, this plugin detects the SSL state on your site and configure it to run on HTTPS. All HTTP references will be automatically converted to HTTPS, and you will not lose any traffic.
GOOGLE ANALYTICS CONFIGURATION
If you use Google Analytics as an analysis of the traffic on your website, you also need to do this step to let you know that your site is now using the HTTPS URL in Google Analytics. And here's how to Update Analytics Settings for HTTPS.
Step 1. Login to your Analytics Account.
Step 2. Go to Admin menu.
Step 3. Open your website settings by clicking "Property Settings" under your domain name.
Step 4. Click Default URL and Select HTTPS from the drop down menu.
Google Analytics Select property
Step 5. Click "Save" button.
Now, Google analytics will provide you with the correct reports about analyzing your traffic after changing using HTTPS SSL Certificates.
see video related to this post, sourced from youtube.com
And that's the steps in installing a free SSL Certificate in WordPress with Let's Encrypt, hopefully this article useful and make your website more secure.
3 komentar
sangat bermanfaat gan informasinya
Thx, finally i found to solve my problem
Thank you bro, this is the article I am looking for. :D